Monday, October 29, 2012

Blogger's Quilt Festival Fall 2012

I decided to submit my recent Marmalade quilt in Amy's Blogger's Quilt Festival. I am sure you have heard about this festival by now; it's hard not to notice it everywhere through all of my blog feeds.


Sorry if you have already read about this quilt, but please bare with me once more. I hand quilted this with one Marmalade charm pack. The top was made with the disappearing nine-patch method, and it was super easy.


I love taking my finished quilt outdoor for photo shoot and especially appreciate the way finished quilts look all rolled up. 


Quilt Measurements: 50"x36"

Special Technique used: Disappearing nine-patch for the top

Hand Quilted by: Me!

Best Category: Favorite Hand Quilted Quilt


Linking up to Amy's post. Go check out all the beautiful quilts entered! You will need more than 10 minutes!

Amy's Creative Side

Saturday, October 27, 2012

Christmas Express Applique

Thank you for your camera recommendations, especially after having seen many great photos you have taken with these cameras. I will definitely have to check them out.

I purchased the most darling Christmas Express applique pattern from Holly Hill Quilt Designs at PIQF this year.  I modified it for a special recipient in mind. I think they will love it.

Choo Choo!

I used to love applique, but haven't done it in awhile. I used the freezer paper method and tried basting glue for the very first time. And there is no going back! The days with pins will not be missed! I cannot wait to stitch this down onto my new 30's reproduction background fabric from my LQS.

The weather in my area has been outstanding. I hope you are enjoying your weekend doing what you love. Talk soon.

Saturday, October 20, 2012

Another Hand Quilted Finish

I am on a roll! I finished the Marmalade quilt that I started in September. This is scary because according to my blog posts, I started and finished this quilt in only one month! I machine pieced the top and hand quilted everything else. It was my first time attempting the scalloped edge, and I think it came out pretty good. It's not perfect, but I will live with it.

This quilt measures approximately 50" x 36".

I used one Marmalade charm pack, combined it with a white sashing, and finished it with a matching yellow border found at my LQS. And of course, I used Quilter's Dream Cotton 100% pure cotton batting. This photo quality is not great at all. I need a new camera to show off all of my beautiful stitches. Do you have recommendations for a good camera? I want one of those big and fancy kind that zooms in and out!

Beautiful scalloped edge.

I machined washed and dried this finished quilt. The crinkly look is just so perfect! My dog thinks so too. He refused to move from my quilt! Gotta love him :)

"Say what!? I am not moving!"

When binding for the scalloped edge, you need to cut on the bias -- this will allow the fabric to stretch and curve around the scalloped edge. I used this tutorial on how to do the cutting. Then I watched the tutorial by the Missouri Quilt Company on how to do the scalloped edge binding. I recommend both of them.

Saturday, October 13, 2012

PIQF 2012

I took Friday off to attend the annual PIQF held at the Santa Clara Convention Center. I am so lucky that this place is so close to where I live. While I was uploading photos from yesterday, I realized that this was my sixth year attending this event! It's one of my favorites shows, and I look forward to it every year. A lot may have changed over the years, but my love for 30's reproduction fabrics remain the same, and I was able to score quite a bit of them this year. I spent about four hours on the market floor and barely had time to visit the exhibit section.


Here are some highlights of my favorite booths:

American Jane: I adore all things American Jane. I bought a few charm packs again and "A Baker's Dozen" book by Sandy. Sandy is the founder and owner of American Jane, and she signed my book! Oh so excited!
The "American Jane" booth. 

Cotton and Chocolate Quilt Company: I visit this booth every year because I love their hexagon templates. I bought more this year including size 3/8"! They are tiny hexagons, but they are just too vintage and cute to pass up. I recently read about this company in a quilting magazine, and they were considered one of the top ten quilt shops in the US! The owner was so sweet and nice. I also bought this light gadget you wear around your neck.

I am going to make one of these using these tiny strips of 30's fabrics I got. 

YLI: Their hand quilting threads are the best -- hands down. 
 
Holly Hill Quilt Design: My new discovery, but gosh, everything they had was just so cute. I had to get "everything." 

This is one of my favorite quilts on the exhibit floor. I love these aprons using reproduction fabrics.

"Chicken Aprons" by Barbara Bickford.

Saturday, October 6, 2012

Apron for Olive Oil Bottle

So remember this mini apron I made my mom for her dish detergent? She decided it would be better for her oil bottle -- the kind with the pour top you use to store olive oil. I was watching her cook the other day and noticed that the fabric slips against the olive oil bottle, and that she had to grip the bottle and the fabric so the mini apron wouldn't slip. Well, I will not allow this, so I revised my mini apron design with an anti-slip backing. Since several readers requested it, I decided to write up a tutorial.
 I love this French inspired fabric from a local quilt shop. 

This reminds me of my honeymoon in Paris.

:: Mini Apron for Dish Detergent or Any Bottles! ::

MATERIALS:
- Scrap piece of regular quilting fabric for the front of the apron
- Scrap piece of anti-slip fabric (see image below) for the back of the apron. I got mine from Jo-Ann Fabric. This non-slip fabric works like magic!
- One 25" x 2" strip of fabrics for the ruffle
- Two 10" x 1" strips of fabric for the two ties
- One 4" x 1" strip of fabric for the neck strap
- Pattern for the mini apron. 

INSTRUCTIONS:
1. Try to prewash all fabrics. Download and print the apron pattern.

2.  Trace the mini apron pattern onto your front and backing fabrics. Cut them out.


3. It's time to make the ruffle (aka pleats); I think this is the trickiest part of the entire project! Fold the 25" x 2" strip of fabric in half length wise right-side together. Stitch the two sides as show below. 


Then turn it inside out so you will have two nice corners. Iron it well.

4. Time to create the pleats. Take this nicely ironed strip to your sewing machine and simply create as many pleats as you need to go around the curve of the apron. Just eye ball it! I used my quarter seam footer to help guide me.


Here is how your pleats should look. The length should be about 13".


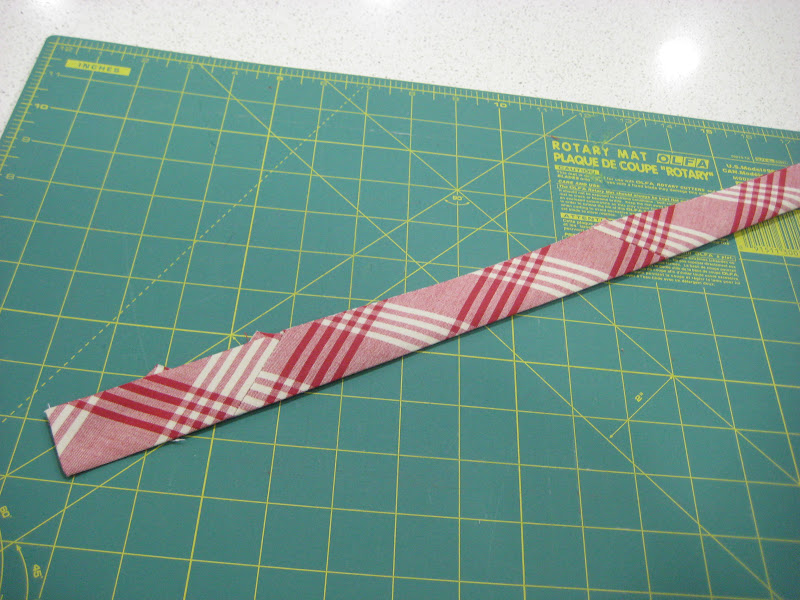
5. Now let's prepare the straps used for this apron. Take your three straps of 1" fabrics and fold them like you would with binding.


 Stitch them up!

6. Okay. We are going to sew this whole thing up. You are about done! I find it easier to sew the top first: two fabrics right-side facing each other with the neck strap inside these two fabrics. Open it up, as shown below. And sew your ruffle first onto your main fabric. Then sew the two straps on top of the ruffle. Are you following me?!


 7. Now close this up, and you are going to sew around the entire apron with all straps and the ruffle in between these two fabrics. Leave about 2" of opening so you can turn everything inside out. Trim and snip around the corners.


 8. Turn it inside out, iron it, and blind stitch the 2" opening. And you are all done!


Ah! So cute. I think I will have to make another one for my olive oil bottle! 

9. My other version of this apron has a little red heart pocket on one side. You can add these pockets to the apron at this point if you like.

I hope this tutorial makes sense and that you are able to follow. Let me know if anything doesn't make sense. Thanks, mom, for your creativity. I see where I got mine from :)